Data TransferData Transfer
The Data Transfer function allows data to be manually transferred from the instrument to a specified location and file. The instrument can only store data from one experiment at a time; therefore, to save the data it must be transferred from the instrument prior to the start of the next run. The data is normally transferred automatically from the instrument to the controller; however, if the Data File Acceptor (DFA) fails to transfer the data file successfully at the end of the run, the software will automatically post an error message indicating that the file was not received from the instrument.
The procedure listed below occurs automatically when:
The Data
File Acceptor (DFA) fails to receive the data at the end of the run. It
will halt the current sequence and then post the following message. Click
OK.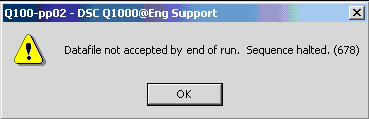
A second
message will then prompt you to manually transfer the file. Click Yes to open the Data
Transfer window or No
to cancel.
When Yes is selected, the
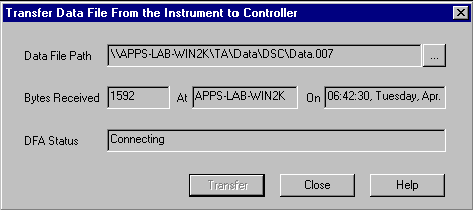
Data Transfer window
will appear. Click the Browse button to specify the data file path and
name and then click the Transfer
button to start transferring the data. 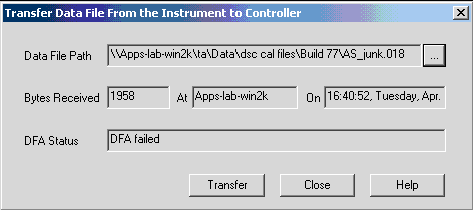
When the file transfer is complete, click the Close button to exit.
Select Tools\Data Transfer from the main menu.
Click the Browse button to specify a Data File Path and file name.
Click the Transfer button to start the process.
The DFA Status will switch from:
Idle to Connecting: When the data file transfer process has started.
Connecting to Receiving: When the controller starts receiving the data file from the instrument.
Receiving to Completed: When the data file transfer process has finished.
When the data file transfer is complete, select the Close button to exit.