 Filling the LNCS
 Filling the LNCS
The Liquid Nitrogen Cooling System (LNCS) must be filled from a bulk storage tank of liquid nitrogen. There are basically two methods that can be used:
Autofilling refers to the automatic filling of the LNCS from any source, whether it is filled locally from a bulk storage tank located close to the unit or filled at some remote location away from the lab. Local autofilling is the most convenient method of filling the tank. Autofill uses a function controlled from the DSC instrument control software. You can also perform an autofill sequence at a remote location, if power is available to run the unit.
Manual filling is the method that must be used if no power is available to allow autofilling. Manual filling is normally done at some remote location where electricity is not accessible.
At method start the LNCS is enabled and the cell temperature is held at 20°C until the LNCS indicates it is operating and ready to go.
Click here for more information on filling the LNCS:


To use the Autofill capability you will first need to connect the cooling accessory to a bulk source of liquid nitrogen as directed below, then fill the dewar. After the initial filling, you can set up the software to have the LNCS autofilled after experiments (programmed autofilling).
Arrange the low pressure bulk storage source physically close enough, within 1.8 m (6 ft), to the LNCS so that the autofill transfer tube can be easily connected between the source and the LNCS. Likewise the LNCS and the instrument need to be in close proximity to allow connection of the 1.8 m (6 ft) transfer hose.
Connect the LNCS for automatic filling:
Attach the transfer
tube to the LNCS Autofill fitting (shown in the figure below).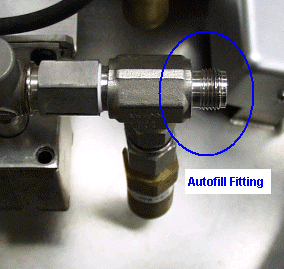
Attach the other end of the transfer tube to the bulk storage container using the union and adapter fitting (provided in the accessory kit).
Install the cooling head on the DSC as directed, if it is not already installed. The cooling head must be in place on the cell and the cell must be operational.
Turn on the power to the LNCS and the instrument.
Fill the dewar with liquid nitrogen before beginning an experiment as directed in the next section.
The LNCS must be filled before cooling experiments can be performed on DSC Q Series™ instruments. Follow the instructions in this section to fill the LNCS.
Using the Thermal Advantage Q Series™ Explorer, connect to the desired instrument. Select Control/LNCS Fill/Fill from the instrument control main menu. The LNCS will be filled automatically.
NOTE: To stop the filling, select Control/LNCS Fill/Cancel Fill from the menu.
The autofill will shut off when the dewar is full, the bulk storage tank is empty, or the LNCS tank pressure is below 1 psig for more than 1 minute. Once the dewar has been filled initially, you can set up programmed autofilling as directed in the next section.
“Autofilling” also refers to the automatic refilling of the LNCS from the bulk storage tank between runs. This section tells you how to set up the LNCS and the connected instrument to allow autofilling.
The Q Series™ instruments automatically control the LNCS, which regulates pressure, supplying liquid nitrogen to the cooling head.
To automatically refill the LNCS with liquid nitrogen after an experiment on a Q Series™ instrument is completed, access the Tools/Instrument Preferences/Cooler Page, select LNCS Autofill if below, then enter the desired percent.
There is also the ability to perform an autofill sequence at a remote location (away from the controller and instrument), if power is available to run the unit. Depressing the Fill button on the side of the electronics control enclosure for 3 seconds or longer initiates an autofill. This same button will reset the LNCS if depressed for less than three seconds. See Remote Autofill for details.
If power is not available at the remote filling location, the LNCS can be filled manually. See Remote Manual Fill for details.
The section below describes both the automatic and manual remote filling methods.
 Follow the directions in this section
to fill the LNCS automatically at a remote location:
Turn off the power to the LNCS.
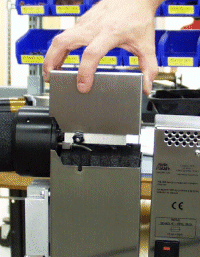
Loosen the captive screws on either side of the top cover for the liquid delivery tower. Pull the cover straight up to remove it as shown in the figure here.
Using a 9/16-inch wrench remove the smaller liquid delivery line from its fitting as shown in the figure below.
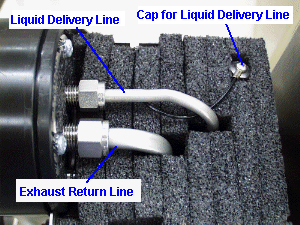
Using an 11/16-inch wrench remove the larger exhaust return line from the remaining fitting.
 Pull the feed hose off the liquid delivery tower. Located
in the top of the tower is the cap for the liquid delivery line (shown
in the figure above). Remove
the cap with its attached wire from the tower insulation.
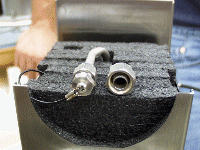
Screw the cap onto the liquid delivery line. See the figure above right.
WARNING: If the feed hose is disconnected from the LNCS, the fitting on the liquid supply line must be capped (see steps 5 and 6) to prevent liquid nitrogen from spraying out of the fitting during the fill process.
Disconnect the house nitrogen gas supply tube, if connected.
Disconnect the 15-pin D connector cable at the LNCS. Disconnect the 8-pin DIN cooling head connector from the electronic control box.
Unplug the power cord, but leave it attached to the LNCS.
Roll the LNCS to the location of the bulk storage source and plug the power cord into the closest power outlet. Turn the power switch ON.
 Make sure that the bulk storage source that will be used for
filling the LNCS is a low pressure (maximum 25 psi) container.
Connect the transfer hose from the bulk source to the autofill fitting shown in the figure to the right.
Open the valve on the bulk storage source.
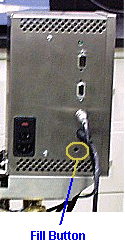 Depress and hold the Fill button (shown in the figure to the
left) on the LNCS control box for 3 seconds to initiate the autofill.
The filling
will stop automatically when the dewar is full.
NOTE: Cold gas will escape from the LNCS vent during the filling process. The fill process normally takes 15 to 40 minutes depending on the liquid level.
NOTE: Frost will build up on the tubing and parts of the LNCS and storage tank while the liquid nitrogen is being transferred.
After the autofill has completed, allow sufficient time for any liquid remaining in the transfer tube to vaporize.
Close the valve on the nitrogen bulk storage tank and immediately disconnect the transfer tube from the bulk source.
Disconnect the transfer hose from the LNCS autofill valve, turn off the power switch, and unplug the power cord.
Return the LNCS to its location near the analysis instrument, and reconnect the cooling accessory by reversing steps 1 to 9.
 Follow the directions in this section
to fill the LNCS manually at a remote location:
Turn off the power to the LNCS.
Loosen the captive screws on either side of the top cover for the liquid delivery tower. Pull the cover straight up to remove it as shown in the figure here.
Using a 9/16-inch wrench remove the smaller liquid delivery line from its fitting as shown in the figure below.

Using an 11/16-inch wrench remove the larger exhaust return line from the remaining fitting as shown in the figure above.
 Pull the feed hose off the liquid delivery tower.
Locate the cap for the liquid delivery line (shown in the figure above) in the top of the tower. Remove the cap with its attached wire from the tower insulation.
Screw the cap onto the liquid delivery line. See the figure above right.
WARNING: If the feed hose is disconnected from the LNCS, the fitting on the liquid supply line must be capped (see steps 5, 6, and 7) to prevent liquid nitrogen from spraying out of the fitting during the fill process.
Disconnect the house nitrogen gas supply tube, if connected.
Disconnect the 15-pin D connector cable at the LNCS. Disconnect the 8-pin DIN cooling head connector from the electronic control box.
Unplug and disconnect the power cord from the LNCS.
Roll the LNCS to the location of the bulk storage source.
Make sure that the bulk storage source that will be used for filling the LNCS is a low pressure (maximum 25 psi) container.
Using a 11/16-inch wrench, remove the cap from the manual fill fitting (shown in the figure below). Connect the transfer hose from the bulk source to the manual fill fitting.
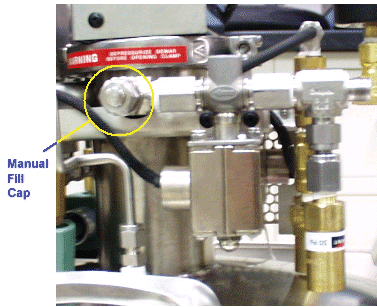
Place the dewar on a scale, if one is available, so that you can monitor the weight to determine when the dewar is full.
Open the valve on the bulk storage source and leave it open until the dewar reaches a filled weight of 87 kg (193 lbs).
WARNING: If liquid begins to spill from the vent during filling, stop the filling process immediately by closing the valve on the bulk source. This must be done quickly to prevent freeze damage to the unit.
NOTE: Cold gas will escape from the LNCS vent during the filling process. The fill process normally takes 15 to 40 minutes depending on the liquid level.
NOTE: Frost will build up on the tubing and parts of the LNCS and storage tank while the liquid nitrogen is being transferred.
Close the valve on the nitrogen bulk storage tank.
Allow sufficient time for any liquid remaining in the transfer tube to vaporize.
Disconnect transfer hose from the manual fill valve and replace the cap using the wrench to tighten snugly (do not over tighten).
Return the LNCS to its location near the analysis instrument, and reconnect the cooling accessory by reversing steps 1 to 10.