 Q2000/Q200/Auto Q20 Motor Test
 Q2000/Q200/Auto Q20 Motor Test
The individual motors of the instrument can be executed using the Autosampler Motor test functions. To perform an motor test, follow these steps:
Access the Autosampler motor test functions via the touch screen or the instrument control menu. Click on the following link to display the appropriate steps:
Autosampler motor test via touch screen
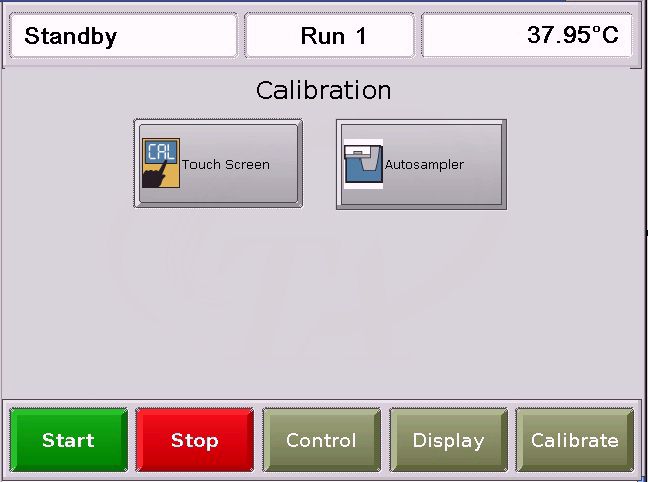
Touch the Calibrate button at the bottom of the touch screen. The figure shown below will be displayed. See Introducing the Touch Screen for more information.

Press the
Autosampler Calibration
button, ![]() .
.
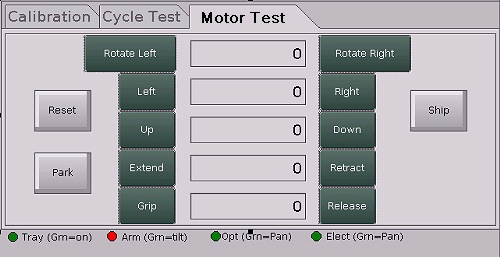
Select the Motor Test tab, the touch screen shown in the figure below is displayed. Press the button to move the desired motor.

NOTE: For
an explanation of the red and green sensor indicator lights at the bottom
of the screen, click here Sensor
Indicator Lights
Autosampler motor test via instrument control
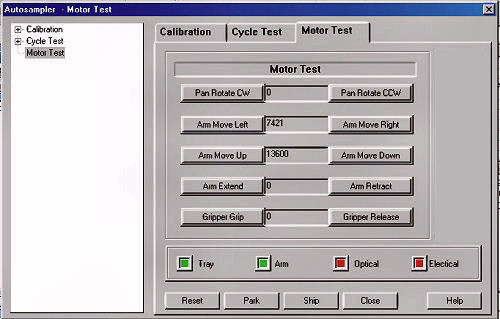
Select Calibrate/Autosampler from the instrument control menu.
Select the Motor Test tab or select Motor Test from the list on the left. The following window is displayed.

NOTE: For
an explanation of the red and green sensor indicator lights at the bottom
of the screen, click here Sensor
Indicator Lights
Select the motor test desired. A brief description of the function of each item is provided in the table below.
|
Key Name |
Description |
|
Reset |
Clears all commands, instructs the unit to locate all home positions, and returns the Autosampler to the park position. Also instructs the Autosampler to "forget" the current lid and sample pan locations (i.e., assumes the cell is empty). |
|
Park |
Places the Autosampler in the Park position seen below.
|
|
Ship |
Places the Autosampler in the shipping position seen below.
|
|
Rotate Left |
Moves the sample tray counter-clockwise one position. |
|
Rotate Right |
Moves the sample tray clockwise one position. |
|
Left |
Moves the sample tray to the left one position. |
|
Right |
Moves the sample tray to the right one position. |
|
Up |
Raises the sample tray up one position. |
|
Down |
Moves the sample tray down one position. |
|
Extend |
Indicates the extend position of the finger assembly. One (1) is the extended position. |
|
Retract |
Indicates the retract position of the finger assembly. Zero ( 0) is the home (retracted) position. |
|
Grip |
Indicates the gripper finger position for the gripping state. Zero (0) is the home or closed position. |
|
Release |
Indicates the gripper finger position for the release state. One (1) is the open position. |